


GravityCerts is very excited to announce our latest integration with Nowcerts’ CRM called Automate365! Now its easier than ever to send your Gravity Form submissions into Automate365.
Here are just some of the integration options available:
- Create or update a new lead.
- Add the new lead to a pipeline stage.
- Assign the lead to a campaign.
- Add a lead to a workflow.
- Add multiple Tags to the lead to trigger any number of actions in Automate365.
- Move a current lead across pipeline stages.
- Assign the lead to a specific agent.
- Add a note to the lead’s account.
- Create a task in the lead’s account and assign a user to the task.
- Remove a lead from a pipeline, campaign, or remove tags.
- …and much more
What is Nowcerts Automate365?
Automate365 is a new CRM created by Nowcerts. It is an all-in-one sales platform to grow revenue for Independent Insurance Agencies. Automate365 allows agencies to capture, nurture, and close more deals with tools designed for the insurance industry. Their philosophy is simple – everything is built around activity-based selling. Insurance agencies can manage and track leads, track communications, automate the sales process, see all deals in a visual sales pipeline, and make sales more efficient.
How do I set up my Integration with Gravity Forms and Automate365?
Setup with your website and Automate365 is simple.
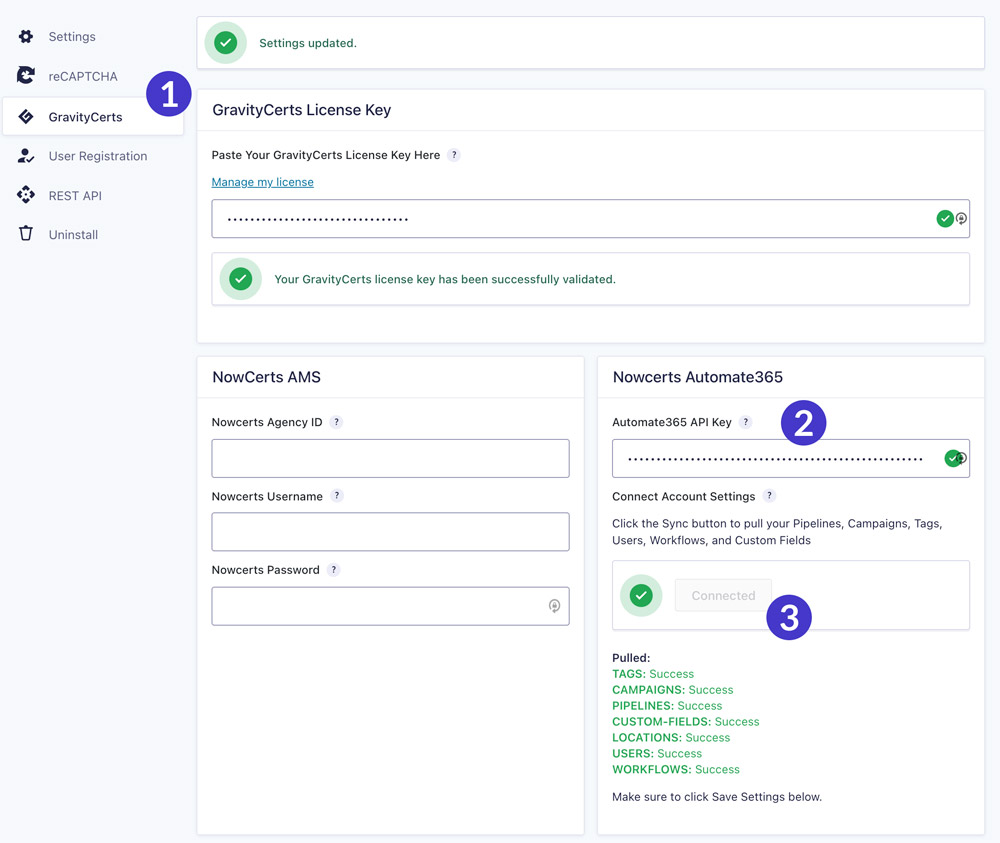
- In your Automate365 account go to Settings, then click the clipboard icon to copy your API Key.
- Next, go to your GravityCerts Settings page in your WordPress admin located under Forms > Settings > GravityCerts.
- Paste your API Key into the Automate365 API Key field, then click the Connect button. GravityCerts will pull all your Pipelines, Campaigns, Tags, Users, Locations, and Custom Fields so you can use them with your forms.
- Make sure to scroll to the bottom and click Save Settings.
Your website is now connected to your Automate365 account.
So now you can navigate to any of your forms to create a new GravityCerts feed. Click to create a new feed and configure your desired settings. You may also add feed conditional logic to limit the feed from sending into your Automate365 account based on your selected criteria.
GravityCerts Feed Settings Walkthrough for Automate365
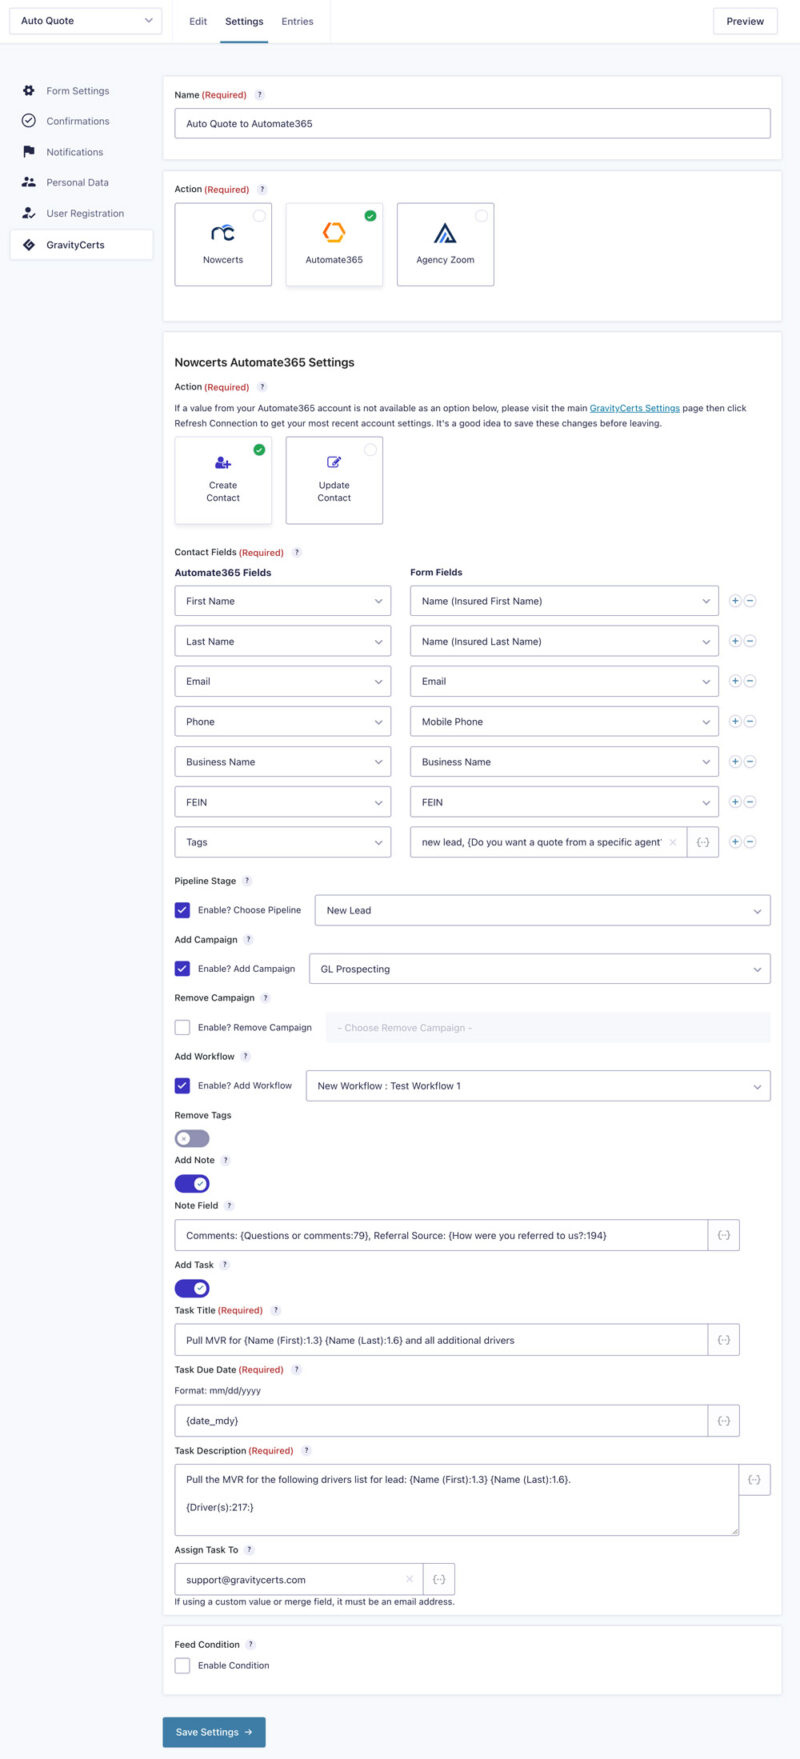
Let’s walk through the options in the screenshot above.
- First create a new feed and give it a name. This is an auto quote form so it’s simply named Auto Quote to Automate365.
- Select Automate365 from the Action options, and in this case we are created a new lead, so Create Contact was selected.
- Next, select the form fields you want to send to Automate365. The left column are all the fields available in your Automate365 account, including all custom fields. The right column are all your available form fields. In this example, only First Name, Last Name, Email, Phone, Business Name, FEIN, and Tags are being sent.
- The Tags field is sending two (2) tags; “new lead” and the name of the agent selected on the form.
- This auto quote form has a dropdown field named, “Do you want a quote from a specific agent?”, that allows the user to choose which agent they would like to work with. The selected agent’s Name will be added as a tag.
- Adding the agent’s name as a tag allows a Trigger to be used inside Automate365, assigning the agent as the lead owner.
- Leads submitted will flow into the New Lead pipeline stage in the New Business Pipeline.
- This will start the GL Prospecting Campaign created in Automate365.
- This lead will also be added to the New Workflow: Test Workflow 1 workflow.
- Next we add a Note with the new lead using submitted form data. In this case we are creating a note using the Comments form field and “How were you referred to us?” form field.
- Finally, a Task is created and assigned to a user telling the user to pull the MVRs for this lead, and list of drivers. Again, these fields are using merge tags submitted by the lead.
As you can see, a lot of integration options are available here that you can customize specific for your agency needs.
How to I get started?
Getting the plugin is easy. If you already have a GravityCerts hosted website, the integration is already available for you to use. So you can get started right now!
But what if I don’t have a GravityCerts Website?
We would be happy if you joined our family. Please schedule a demo with us, or if you’re ready to get started now, choose a website package now.
I already have my own website using Gravity Forms
That’s great too. Download the GravityCerts Plugin, activate it on your WordPress website and enter your license key.
Because Automate365 is a new product and our integration is new, we are excited to hear about the creative ways agencies use this integration. Please reach out to us if you have questions on how to make an integration idea with Automate365 work.
